Only certain types of yogurt are healthy and beneficial for chickens. Giving your chickens the wrong type is not only unhealthy, but can cause digestive issues, including diarrhea. Discover how to make homemade instant pot yogurt for chickens and how they benefit from it!

Ingredients for Homemade Instant Pot Yogurt for Chickens
You will only need two ingredients and an Instant Pot to make homemade instant pot yogurt for your chickens, 1/2 gallon of milk and two tablespoons of a yogurt culture. If you want to make yogurt that is ok for your chickens to consume, the type of milk, yogurt culture and amount of time you culture it is important.
Milk for Chicken’s Yogurt
The yogurt consistency is influenced by the type of milk that you use. There are so many varieties to choose from; cows milk, goats milk, sheep milk, lactose-free milk, non-dairy milk, etc.
In order to make yogurt, the milk has to be suitable for culturing. Cows milk is the most popular milk used to make yogurt, followed by both sheep and goat milk.
Lactose-free and non-dairy milk are not suitable for yogurt making. Neither one contains enough “food” for the bacteria.
Goat milk has less protein, resulting in a thinner yogurt. Sheep milk is sweeter and results in a thicker yogurt. Cow milk seems to have just the right amount of protein that when heated it coagulates forming a nice creamy yogurt.
I highly recommend using whole milk over skim or non-fat milk. Whole milk will produce a thicker, creamier yogurt.
Choosing a Yogurt Starter

The most important thing is finding a yogurt that has live active cultures in it. When choosing a yogurt, look at the ingredients on the back. The first ingredient will be milk and should be followed by “Contains Live Active Cultures (S. Thermophilus, L. Bulgaricus, L. Acidophilus, Bifidobacterium, L. Casei).”

Choose a plain yogurt. Flavored yogurts contain a lot of added sugars and just like added sugar is not good for humans, it isn’t good for your chickens either. Increased sugar intake can lead to overweight as well as undernourished chickens.
Instant Pot with a Yogurt Function
Instant Pot yogurt can be made with or without the “Yogurt” function, but it is easiest on the models with this function. For directions on how to make yogurt without the yogurt button read this article: How To Make Instant Pot Yogurt WITHOUT The Yogurt Button.

Have You Heard that Yogurt Was Not Good for Chickens?
According to a gastroenterologist that has a private practice in Niagara Falls, New York, “The organisms that make yogurt what it is, also produce lactase to digest the lactose contained in yogurt.”

“The organisms that make yogurt what it is, also produce lactase to digest the lactose contained in yogurt.”
When making homemade yogurt in your instant pot for your chickens (or yourself for that matter), the live organisms that are in the yogurt “eat” the lactose.
If you let the yogurt set for a longer period of time, it will actually digest all of the lactose. This makes it safe for your chickens to consume. Yogurt that you buy in the store still contains some lactose.
Chickens are NOT lactose intolerant. Chickens do produce a small amount of lactase which does not make them lactose intolerant. This is why they are ok consuming a small amount of products containing lactose without any harmful effects.
By letting your homemade instant pot yogurt incubate a longer time, all of the lactose will be consumed.
Step by Step Instructions: How to Make Homemade Instant Pot Yogurt for Chickens
Step 1: Preparing Instant Pot for Yogurt

- Remove Rubber Ring in Instant Pot Lid: This rubber ring absorbs the smell of previously cooked foods and no matter how much you wash it, it still holds a smell.
- Clean the Metal Pot: This can be done with warm, soapy water. Just make sure it doesn’t have a smell. The last thing you want is for your yogurt to smell like your teriyaki chicken from the night before!
Step 2: Heating Milk in Instant Pot

- Add 1/2 gallon of whole milk to Instant Pot.
- Place lid on Instant Pot. It does not matter if the pot is set to venting or sealing, because the rubber ring is removed.
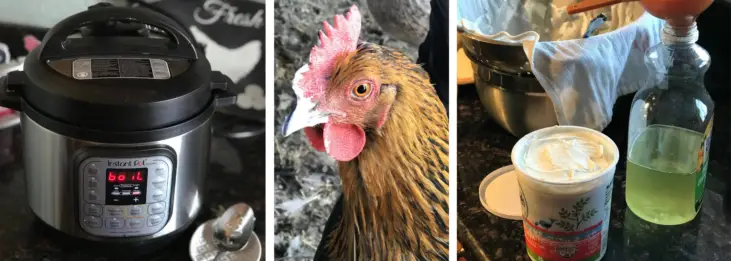
- Press “Yogurt” button two times until you see the word, “boil.”
- Instant Pot will automatically heat milk to 180 degrees and alert you when it reaches this temperature.
- Place lid on and wait until Instant Pot beeps and shows, “yogurt.”
Step 3: Cooling Milk for Yogurt Making

- Using potholders, remove metal pot from Instant Pot.
- Let milk cool to 105 degrees.
- To speed up the process: Fill a bowl with cold water and place metal Instant Pot inside of it to cool off the milk.
Step 4: Adding Yogurt Culture to Instant Pot

- Add 2 tablespoons of plain yogurt to 1/2 gallon whole milk and stir until completely dissolved.
- If you are using a different amount of whole milk, add 1 tablespoon per quart of milk.
- If using non-fat milk, add 2 tablespoons per quart of milk (yogurt will still be not as thick when using non-fat or skim milk).
- Yogurt must contain active live cultures.
Step 5: Incubating Instant Pot Yogurt for Chickens

- Place metal pan back into Instant Pot and press the “yogurt” button.
- Press the “+” button until the time reaches 18 hours. You can set the timer up to 24 hours. The longer the time, the tarter the yogurt. This should have only trace to zero lactose, which chickens can tolerate.
- Timer will count up.
- Regular yogurt incubates 8 hours, but it will still contain lactose. (chickens should only be given small amounts with this.)
Step 6: Straining Whey Out of Yogurt
- Set up a large bowl with a strainer on top.
- Line strainer with cheesecloth or thin dish towel.
- Pour yogurt inside strainer.
- Whey will drip into bowl below.
- Place in refrigerator for 8 hours or overnight.
- If you don’t mind a thinner consistency yogurt, you can skip this step.
- Don’t throw away your whey. There are many other uses for whey, including adding to protein shakes, smoothies, substituting liquid in cooking and in your garden!
Step 7: Spoon Yogurt Into Container
- Yogurt should be much thicker and creamy now that whey has been drained.
- Scoop the yogurt and store it in a saved yogurt container. 1/2 gallon of milk will turn into

Step 8: Feeding Your Chickens Homemade Instant Pot Yogurt
Chickens absolutely love fresh yogurt! Just make sure that it is the homemade type, with trace to zero lactose.
If you notice that any of your chickens are having digestive issues or diarrhea, decrease the amount of yogurt you give to them and also increase the incubation time, closer to 24 hours.

Benefits of Serving Chickens Homemade Instant Pot Yogurt
- Active Live Cultures are good for their gut health.
- Increased Calcium is good for developing strong egg shells and bones.
Only feed yogurt to your chickens after they have consumed their regular feed. Plain, Instant Pot yogurt that has been incubated long enough to remove the lactose can be safely given to your chickens 2 times a week.
Some chicken owners like to mix the yogurt with fruits, such as apples or berries.
Watching chickens eat fresh yogurt can be quite messy, but is a such a funny sight to see!
Conclusion: HOW You Make Instant Pot Yogurt is Key for Chicken Consumption
While chickens are not lactose intolerant (they do produce a small amount of lactase), they are not able to consume lactose in large quantities.
Choosing the right milk, starter and the way you prepare the yogurt is what makes it ok to serve to your chickens. By preparing yogurt in the Instant Pot you can eliminate the lactose, rendering it much safer for your chickens to consume.


